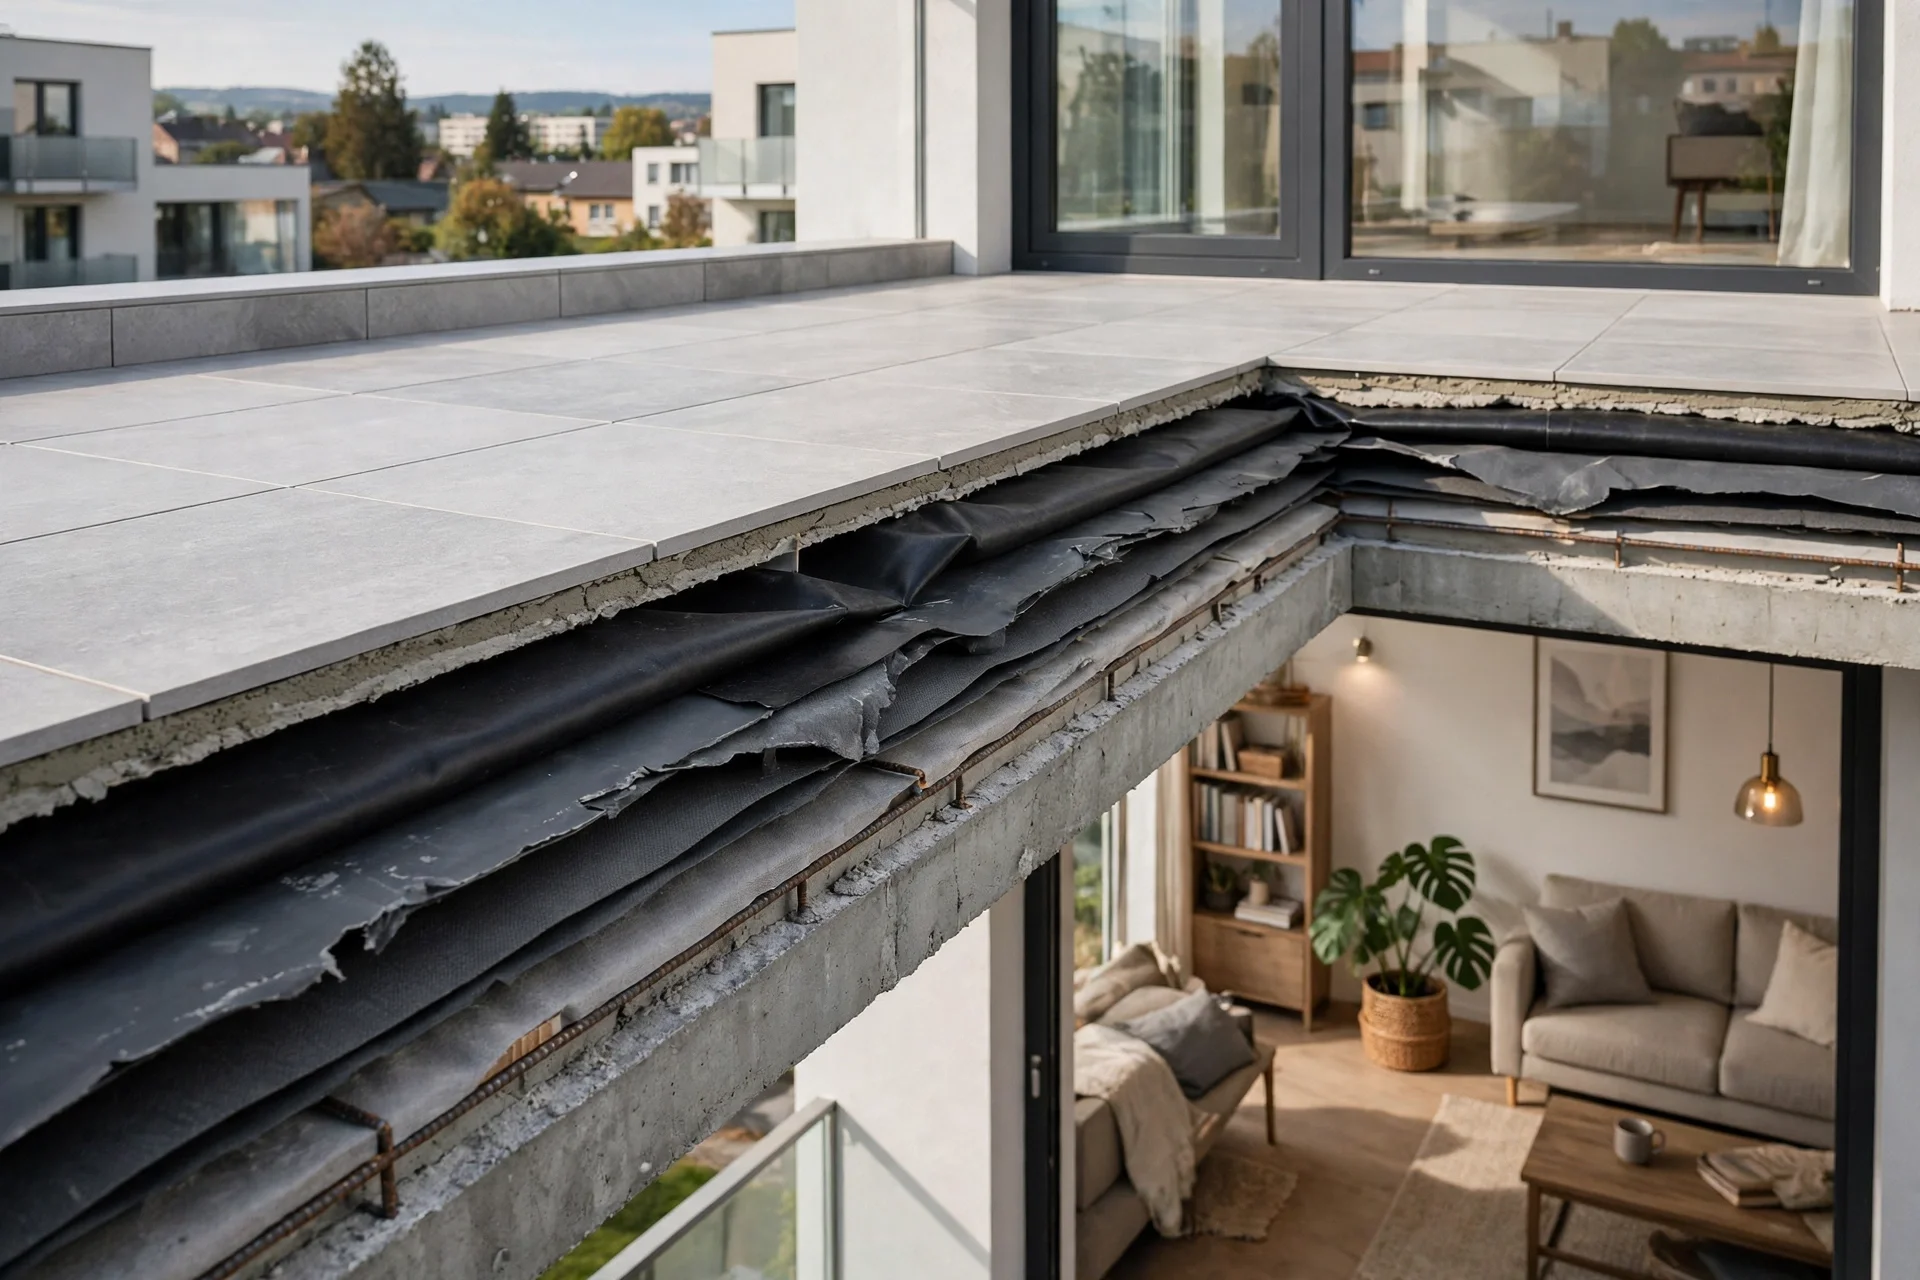
A balcony above a bedroom or living room is really a roof that people walk on, and a single waterproof membrane is a single point of failure.
Balconies over occupied space fail quietly at first. A hairline crack in a tile joint, a perished sealant bead at the door threshold, or a blocked outlet can let water into the build-up for months before a stain appears on the ceiling below, and by then the slab, the insulation, and the ceiling finishes may all need attention. Designing two independent moisture barriers, with a drainage path between them, turns that slow hidden failure into something you can detect and fix early.
Why Balconies Over Living Space Demand Two Lines of Defence
A balcony slab over a bedroom carries a different risk from a balcony over open air. Any water that passes the wearing surface has nowhere harmless to go: it soaks the screed, travels along the slab, and eventually finds the ceiling of the room below, where it stains plaster, feeds mould, and corrodes reinforcement.
A single membrane can work when it is perfectly installed and perfectly maintained, but balconies move. Daily temperature swings expand and contract the slab, tiles, and screed at different rates, and that movement opens fine cracks at joints and junctions over time. A second layer does not just double the protection; it changes the failure mode. Instead of a leak reaching the room below, water is caught between the layers and directed to a drain, where it shows up as a warning rather than a ceiling stain.
What a Dual-Layer Balcony Moisture System Actually Includes
The system has four working parts. The lower membrane sits directly on the prepared slab or on the insulation, and it is the last line of defence. Above it comes the screed, laid to falls, which carries water toward the outlets. The upper membrane sits on the screed, directly beneath the tiles or wearing surface, and it is the first line of defence. Between and around these layers sit the drainage details: outlets, scuppers, upstands, and drip edges that give water a controlled way out.
Each layer must be continuous and fully bonded or fully sealed at its laps, because a membrane is only as good as its weakest joint. The lower layer usually extends up the wall behind the cladding to form an upstand, while the upper layer turns up at the edges and is protected by a metal angle or skirting. When both layers are detailed this way, a failure in the upper membrane still leaves the lower membrane and the drainage path to protect the rooms below.
Reading the Balcony Slab Before You Specify Either Layer
Design starts with the slab, not the membrane. Check the falls first: a balcony needs a fall of roughly one in sixty toward the outlet so water does not pond, and any hollow or backfall in the slab must be corrected with a levelling screed before membranes go down. Look for cracks wider than a hairline, previous repairs, and signs of reinforcement corrosion such as rust staining or spalling, because a membrane laid over a moving crack will eventually split at the same place.
Measure the moisture content of the slab and the screed before bonding anything to them, since trapped moisture blisters adhered membranes and breaks the bond. Check the door threshold height as well: the finished balcony surface must sit below the internal floor level, with enough upstand height at the door to keep wind-driven rain out. If the threshold is too low, the design needs a step or a channel drain at the doorway rather than a membrane detail that cannot work.
Choosing the Primary Membrane Beneath the Screed
The primary membrane, the one below the screed, should be the toughest layer in the system because it is the hardest to reach once the balcony is finished. Liquid-applied membranes, torch-on bitumen, and reinforced PVC or TPO sheets are all used here, and the right choice depends on the substrate, the expected movement, and the climate. A reinforced sheet membrane with heat-welded seams suits large flat balconies, while a liquid-applied membrane follows awkward shapes and upstands without joints.
- Torch-on bitumen: proven on flat roofs, strong puncture resistance, needs a skilled applicator and a dry substrate.
- Liquid-applied polyurethane: seamless around upstands and penetrations, sensitive to damp substrates and cold weather.
- Reinforced PVC or TPO sheet: heat-welded seams and consistent thickness, needs careful detailing at corners and outlets.
- Cementitious coating: simple to apply on sound concrete, best as a secondary layer rather than the primary defence.
Whatever material you choose, confirm it is rated for use as a roof membrane over occupied space and that its warranty covers pedestrian traffic protection, because the screed and tiles above it are the only armour it will ever get.
How the Secondary Membrane Above the Screed Earns Its Keep
The secondary membrane sits directly under the tiles, and its job is to stop the small, everyday leaks that a wearing surface always develops. Grout joints crack, sealant shrinks, and tiles chip, and each of these lets a little water through. Without an upper membrane, that water soaks the screed and sits against the primary membrane for weeks. With one, the water is caught a few millimetres below the surface and guided to the outlet.
A flexible liquid membrane or a bonded sheet membrane works well here, provided it is compatible with the tile adhesive that goes over it. The upper layer must also bond to the drainage outlets and upstands, so water travelling across it reaches the drain instead of pooling at the edges. Think of it as the balcony’s raincoat: it takes the weather first, and the primary membrane underneath is the dry suit that only matters when the raincoat is breached.
Falls, Drains, and Scuppers That Keep Standing Water Off Both Layers
Membranes fail faster under standing water, so drainage is part of the moisture system, not an afterthought. The screed should fall toward the outlet at roughly one in sixty, and the wearing surface should follow the same fall so water never ponds against a threshold or a wall.
Outlets need a flange that bonds to both membranes, with a clamping ring that holds the membrane tight while letting water through. A leaf guard on each outlet is cheap insurance, and the outlet should sit at the lowest point of the balcony, not in a corner where the screed is thickest. Test the falls with a hose before the membranes go down; correcting a backfall after waterproofing means starting again.
| Build-Up Layer | Material | Purpose |
|---|---|---|
| Structural slab | Reinforced concrete, laid to falls | Load-bearing base and first drainage plane |
| Primary membrane | Torch-on bitumen or reinforced sheet | Last line of defence over occupied rooms |
| Protection screed | Sand and cement, laid to falls | Shields the membrane and carries water to outlets |
| Secondary membrane | Liquid-applied or bonded sheet | Stops everyday leaks beneath the tiles |
| Tile adhesive and tiles | Flexible adhesive, frost-resistant tiles | Wearing surface that sheds most rain |
Upstands, Door Thresholds, and the Wall-to-Balcony Junction
Most balcony leaks start at the wall, not in the middle of the slab. Rain runs down the wall, collects at the junction, and finds any gap in the membrane, so both membranes must turn up the wall behind the cladding to form an upstand of at least 150 millimetres above the finished surface.
The door threshold is the hardest junction of all, because the balcony surface, the internal floor, and the door frame all meet there. A channel drain set into the balcony just outside the door catches wind-driven rain before it reaches the threshold, and the membranes should run continuously beneath the door frame rather than stopping at it. If the finished balcony level ends up higher than the internal floor, water will find the door; correct the levels before you worry about the membranes.
Railing Posts and Penetrations That Puncture Both Layers
Every railing post, pipe, and cable that passes through the balcony surface is a hole in both membranes, and holes are where dual-layer systems most often fail. The best solution is to avoid penetrating the membranes at all: mount railings on the fascia or on the parapet, or use weighted base plates that sit on the wearing surface. Where a post must pass through, it should sit on a raised curb with the membranes dressed up the curb and clamped beneath a cover plate.
- Face-mounted railings: fixed to the fascia, no membrane penetration, but need a strong edge beam.
- Curb-mounted posts: membranes dressed up a raised curb, clamped and sealed, the most reliable penetrated detail.
- Surface-mounted base plates: bolted through both membranes, rely entirely on sealant, inspect them every year.
- Pipe penetrations: use a preformed collar bonded to each membrane, never a bead of sealant alone.
Whatever fixing method you choose, write it into the inspection routine. A post base that was watertight on handover can work loose within a few years, and a loose post with a cracked seal is a direct pipe into the slab below.
Flood Testing the Finished Balcony Before the First Rain
A flood test is the only way to know the system works before the weather tests it for you. Block the outlets, fill the balcony with water to a depth of about 25 millimetres, and leave it for 24 to 48 hours while you watch the ceiling below and the walls around the balcony for any sign of damp.
Test each layer separately if you can: flood the primary membrane before the screed goes down, and flood the upper membrane before the tiles are laid. A leak found at that stage costs an hour to fix; the same leak found after tiling costs a week. Photograph every stage of the build, including the membranes, laps, and upstands, so that any future investigation starts with evidence rather than guesswork.
| Failure Point | Warning Sign | Prevention |
|---|---|---|
| Tile grout cracks | Damp patches on the ceiling below | Upper membrane beneath the tiles |
| Blocked outlet | Ponding water after rain | Two outlets plus an overflow scupper |
| Low door threshold | Water under the door during storms | Channel drain and correct finished levels |
| Railing post base | Rust staining around the post | Curb mounting or face-fixed railings |
| Failed upstand | Damp wall at the balcony junction | 150 mm upstand behind the cladding |
Seasonal Care That Keeps a Dual-Layer Balcony Watertight
A dual-layer balcony is not fit-and-forget. Clear the outlets and leaf guards at the start of autumn and again after the first heavy leaf fall, and check the sealant at the door threshold and around railing posts every spring. Look for cracked grout, loose tiles, and any ponding after rain, because each of these is an early warning that the upper membrane is about to be tested.
Re-seal joints before they fail rather than after, and keep a simple log of inspections, photographs, and repairs. When you eventually sell the home, that log is worth more than any warranty certificate: it shows the next owner that the balcony over their bedroom was designed, tested, and looked after as the roof it really is.
Dual-Layer Balcony Moisture Protection Questions, Answered
Can I add a dual-layer system to an existing balcony?
Yes, in most cases, but the existing slab and finishes usually have to come up first so both membranes can be laid on a sound, correctly sloped surface. A surveyor should check the slab for cracks, corrosion, and load capacity before you commit, because the new screed and tiles add weight.
Do I really need two membranes on a small balcony?
A small balcony over a bedroom carries the same risk as a large one, because the room below does not care how big the balcony is. The second layer adds a modest cost to the build but removes the single point of failure. On a balcony over open air, a single well-detailed membrane is usually enough; over occupied rooms, the second layer is cheap insurance.
How long should a dual-layer balcony system last?
A well-built system should last twenty years or more before major work is needed, with the wearing surface and sealant needing attention sooner. The membranes themselves are protected from sunlight and foot traffic by the screed and tiles above them, which is why they outlast exposed membranes. Regular outlet cleaning and sealant renewal are what turn a twenty-year system into a thirty-year one.
What fall should a balcony have to drain properly?
Aim for a fall of about one in sixty, roughly 16 millimetres per metre, toward the outlet or free edge. Less than that and water ponds in shallow hollows; much more and the tiles look visibly sloped and furniture sits unevenly. The fall must be built into the slab or screed, not faked with a thicker bed of tile adhesive at one end.
Who should install a dual-layer balcony waterproofing system?
A roofing or waterproofing specialist with experience of balconies over occupied space, not a general tiler. The membrane laps, upstands, and outlet details are roofing work, and they need someone who flood-tests their work. Ask for photographs of the membranes before they are covered, and for a written warranty that covers both layers.
Final Thoughts: Two Balcony Moisture Layers That Protect the Rooms Below
A balcony above a bedroom asks a lot of a single membrane, and the cost of failure is measured in stained ceilings, mould, and structural repair. Two layers, each continuous and properly detailed, with falls that drain and outlets that stay clear, turn that risk into a system you can test, inspect, and trust.
